 Flipora Manual
Contents
Getting started
Install Flipora, then create and publish your first flipbook — it takes about a minute.
Requirements
- WordPress 5.8 or newer, PHP 7.2 or newer.
- Any theme. Flipora also works with the block editor, the Classic editor and Elementor.
- Readers need a modern browser (Chrome, Edge, Firefox or Safari, desktop or mobile).
Install & activate
- Download flipora-4.0.0.zip. Don't unzip it.
- In WordPress go to Plugins → Add New Plugin → Upload Plugin, choose the zip and click Install Now.
- Click Activate. A new FlipBooks menu appears in your dashboard sidebar.
- Optional but recommended: open FlipBooks → Settings → Emails, check your sender name and address, and click Save & send test.
The Plugins screen has Settings and Dashboard shortcuts right under Flipora's name.
Upgrading from an earlier edition
If your site used FlipBook Studio Pro or the Lite edition before, Flipora takes over automatically:
- When you activate Flipora, the earlier edition is switched off.
- All books, pages, categories, leads, statistics and settings are kept exactly as they were.
- Shortcodes already in your posts keep working — no edits needed.
Only one edition can run at a time. If you try to activate the earlier edition again while Flipora is active, WordPress shows a short note instead of an error. To go back, deactivate Flipora first.
Your first book in four steps
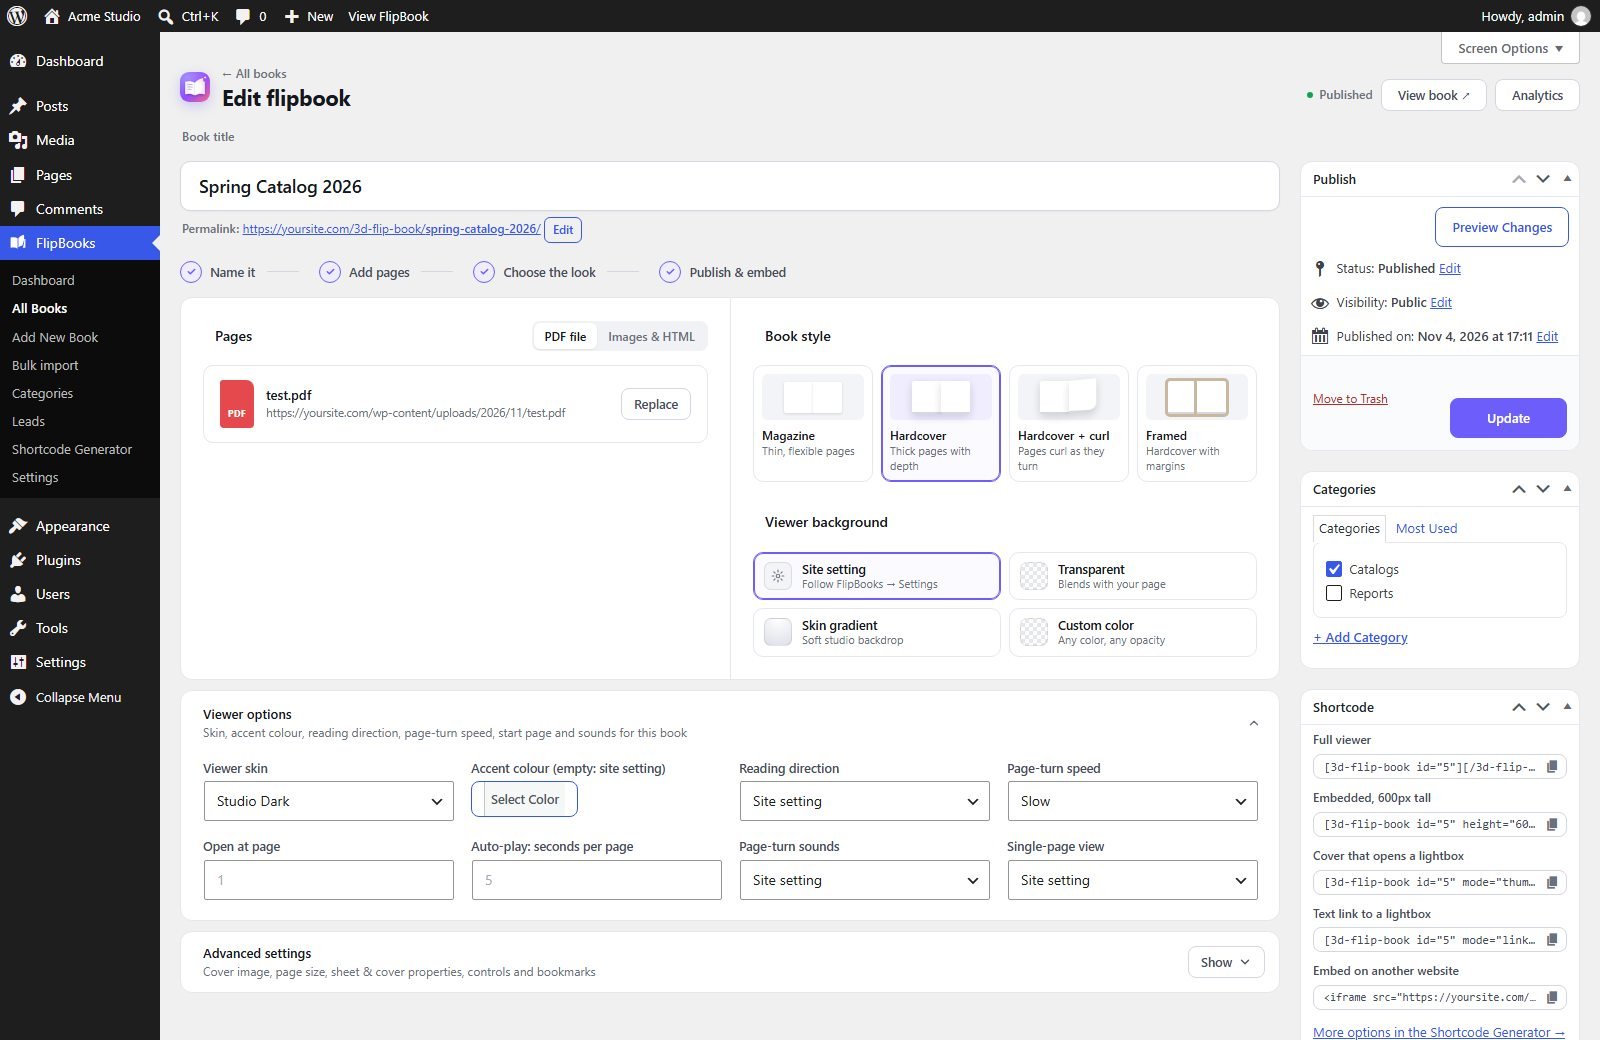
- Go to FlipBooks → Add New Book.
- Type a Book title, for example "Spring Catalog 2026".
- Drop your PDF onto Drop your PDF here (or click Browse media library).
- Pick a Book style and click Publish. Click View book in the message at the top to see it.
Creating books
Every book is created on the same guided screen. Most people only need the top half.
Adding pages
The Pages panel has two tabs.
PDF file
- Drag and drop a PDF onto the panel — it uploads to your Media Library (up to the upload limit your host allows).
- Browse media library — pick a PDF you've already uploaded.
- Use a link — paste the address of a PDF and click Use link. The PDF should be on your own site; many other sites block this.
Once a PDF is chosen, the panel shows its name. Click Replace to swap it for another file — the book keeps all its other settings.
Images & HTML
Build a book page by page from images or HTML instead of a PDF. Choosing this opens Advanced settings, where you add, reorder and edit pages.
Book style & background
Viewer background is the area around the book:
- Site setting — follows Settings → General (the default).
- Transparent — your page background shows through, so the book sits right on your design.
- Skin gradient — the soft backdrop of the chosen viewer skin.
- Custom color — any colour, with an opacity slider.
Viewer options
The Viewer options card in the book editor changes how this one book opens. Anything left on Site setting follows FlipBooks → Settings.
| Option | What it does |
|---|---|
| Viewer skin | Studio Light, Studio Dark, Studio Paper or Classic for this book. |
| Accent colour | The colour of buttons and the progress bar. Leave empty to use the site colour. |
| Reading direction | Left to right, or right to left for Arabic, Hebrew and Urdu. |
| Page-turn speed | How quickly pages turn. |
| Open at page | The page the book opens on. A page link in the address takes priority. |
| Auto-play: seconds per page | How long each page shows during auto-play. |
| Page-turn sounds | Force sounds on or off for this book. |
| Single-page view | Show one page at a time instead of a two-page spread. |
Call-to-action button
Add a button such as "Buy now" or "Request a quote" to the viewer. In the Call-to-action button box:
- Switch on Show a button in the viewer.
- Enter the Button text and Link.
- Optional: set From page and To page so it shows only on those pages, and choose whether it opens in a new tab.
Clicks are counted on the Dashboard, beside your leads.
Advanced settings
Click Show on the Advanced settings card for full control. Turn on show advanced options to reveal every setting. The sections are:
| Section | What you can change |
|---|---|
| General | Book style, the cover image (automatic from the first page, or your own) and the source of the pages. |
| Pages | For image/HTML books: add, reorder and edit pages. For PDFs: page-by-page customisation. |
| Book properties | Size and proportions, lighting, single-page mode and similar options. |
| Sheet, Cover & Page properties | Thickness, stiffness and colours of the paper and cover. |
| Control properties | Which toolbar buttons this book shows, and the default contents tab. |
| Bookmarks | A table of contents that readers can open from the toolbar. |
Anything set to auto follows the global FlipBooks → Settings. Change a value only when this book needs something different.
Managing books
FlipBooks → All Books lists every book with its cover, shortcode, views and average reading time for the last 30 days, and its access status. Hover over a book for these actions:
- Edit, Trash and View — as for any WordPress post.
- Analytics — opens the dashboard for just this book.
- Duplicate — makes a draft copy with all settings, ready to change.
Use FlipBooks → Categories to group books. A category can be shown as a bookshelf with a shortcode (see Shortcodes).
Showing books on your site
There are five ways to show a book. They all look and work the same for readers.
The book's own page
Every published book has its own address, like yoursite.com/3d-flip-book/spring-catalog-2026/. Share that link, or add it to a menu. You can change the 3d-flip-book part under Settings → General → Book permalink base.
Block editor (Gutenberg)
- In a post or page, click + and search for FlipBook (or "flipora").
- Pick a book from the list. A preview with its cover appears.
- In the sidebar, choose the display and skin.
| Display | Result |
|---|---|
| Embedded viewer (fixed height) | The book sits in the page at the height you set (e.g. 600px). |
| Embedded viewer (auto height) | The book fills the available space. |
| Cover that opens a lightbox | Shows the cover; clicking it opens the book in a popup. |
| Text link that opens a lightbox | A link with your own text that opens the book in a popup. |
Elementor
Search the widgets panel for FlipBook and drag it onto your page. Choose the book, display mode, height and skin in the widget settings. The editor shows a preview card; the full 3D viewer appears on the published page.
Shortcodes
Shortcodes work in the Classic editor, text widgets and most page builders. Each book's editor has a Shortcode box with ready-to-copy versions, and FlipBooks → Shortcode Generator builds one for you.
[3d-flip-book id="12"][/3d-flip-book]
Common examples
Embedded, 600px tall
[3d-flip-book id="12" height="600"][/3d-flip-book]

Cover that opens a lightbox, with the title underneath
[3d-flip-book id="12" mode="thumbnail-lightbox" title="true"][/3d-flip-book]

Text link that opens a lightbox
[3d-flip-book id="12" mode="link-lightbox"]Read the catalog[/3d-flip-book]

Bookshelf: every book in category 5, three per row
[3d-flip-book mode="thumbnail-lightbox" tax="5" cols="3"][/3d-flip-book]
All options
| Option | Values | What it does |
|---|---|---|
id | Book ID | Which book to show. The ID is in the All Books list. |
mode | fullscreen (default), thumbnail, thumbnail-lightbox, link-lightbox | Viewer in the page; cover linking to the book page; cover opening a popup; text link opening a popup. |
height | 600, 600px, 80vh | Fixed height for an embedded viewer. Leave out to fill the space. |
title | true / false | Show the book title under a cover. |
template | studio-light, studio-dark, studio-paper, short-white-book-view | Viewer skin for this placement. Default: the skin in Settings. |
lightbox | studio-blur, studio-dim, light, dark, light-shadow, dark-shadow | Popup backdrop style. |
page-n | Number | Open the book at this page. |
tax | Category IDs, e.g. 5 or 5,8 | Show a bookshelf of every book in those categories (leave out id). |
cols | 1–8 | Books per row on a bookshelf (default 3). |
classes | CSS class names | Extra classes for your own styling. |
Embedding on other websites
Show a book on a different website — even one not built with WordPress.
- Make sure Settings → Embeds → Allow books to be embedded on other websites is on.
- Optional: list the websites that may show your books, one per line (e.g.
partner-site.comor*.example.orgfor all subdomains). Leave empty to allow any site. - Open the book, copy the code under Embed on another website in the Shortcode box, and paste it into the other website's HTML.
<iframe src="https://yoursite.com/?fbs_embed=12" width="100%" height="600"
  style="border:0;max-width:100%;" allow="fullscreen" allowfullscreen
  loading="lazy" title="Spring Catalog 2026"></iframe>
To stop one book from being embedded, tick Block embedding on other websites in its Access & protection box. Protection, scheduling and lead capture apply inside embeds too.
Flipbook library
Show a searchable bookshelf of your books. In the block editor, add the Flipora Library block and set the columns, order and filters in the block settings. Anywhere else, use the shortcode:
[flipora-library cols="3" category="catalogs" order="newest"]
| Option | Values | What it does |
|---|---|---|
category | Slugs or IDs, separated by commas | Only show these categories. Leave out to show every published book. |
cols | 1–6 | Books per row (default 3). |
search | yes / no | Show the search box. |
filter | yes / no | Show the category buttons. |
limit | Number | The most books to show. |
order | newest / title | Newest first, or A to Z. |
The reading experience
What your readers see, and the options that shape it.
- Loading message — "Opening your flipbook…" then "Preparing pages 42%". Change the wording in Settings → Viewer → Loading message.
- Toolbar — zoom, fit to view, contents & thumbnails, search, share, full screen, auto play, first/last page, single-page mode, sound, print and download. Choose which buttons appear, and the toolbar's shape and size, in Settings → Viewer.
- Reading progress bar along the top of the viewer.
- Continue where you left off — returning readers are offered their last page.
- Light / dark switch, remembered for each reader.
- Auto-hiding controls for distraction-free reading.
- Phones show one page at a time and support swiping.
- Share to Facebook, X, LinkedIn, WhatsApp or email, or copy the link.
Reader tools
Readers find these in the More (…) menu of the toolbar. Choose which ones appear in Settings → Viewer → Reader tools.
Keyboard shortcuts
| Keys | Action |
|---|---|
| ← → | Previous / next page |
| Home End | First / last page |
| + − 0 | Zoom in / zoom out / fit to view |
| F | Full screen |
| T S | Contents & thumbnails / search |
| P D | Auto play / light-dark viewer |
| B | Save this page |
| R | Read aloud on / off |
| V | Text view on / off |
| ? | Show all shortcuts |
Lead forms
Ask readers for the details you need, and turn readers into contacts.
Turn it on for a book
- Edit the book and find the Lead capture box in the sidebar.
- Switch on Show a form to readers.
- Under When to ask, choose On a chosen page, Before downloading the PDF or Both.
- For a page, set Show the form on page. Use 1 to ask before reading, or e.g. 3 to let people preview two pages first.
- Under Form, keep the Default form (Settings) or choose A custom form for this book.
- Adjust the Heading, Message, Button and Message after sending if you like, then Update.
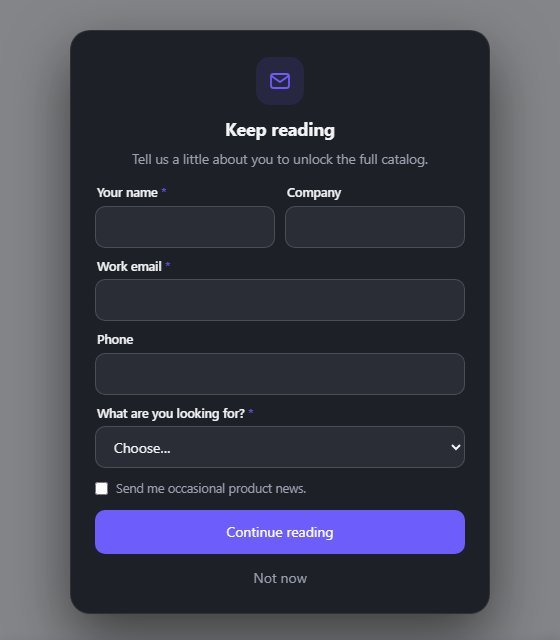
Lead forms work with the Studio skins. A book using the Classic skin switches to Studio Light while the form is on. The form is a friendly gate, not a security barrier. Use a password or members-only access for private files.
Form builder
Build the site-wide form in FlipBooks → Settings → Lead form, or a book's own form inside its Lead capture box.
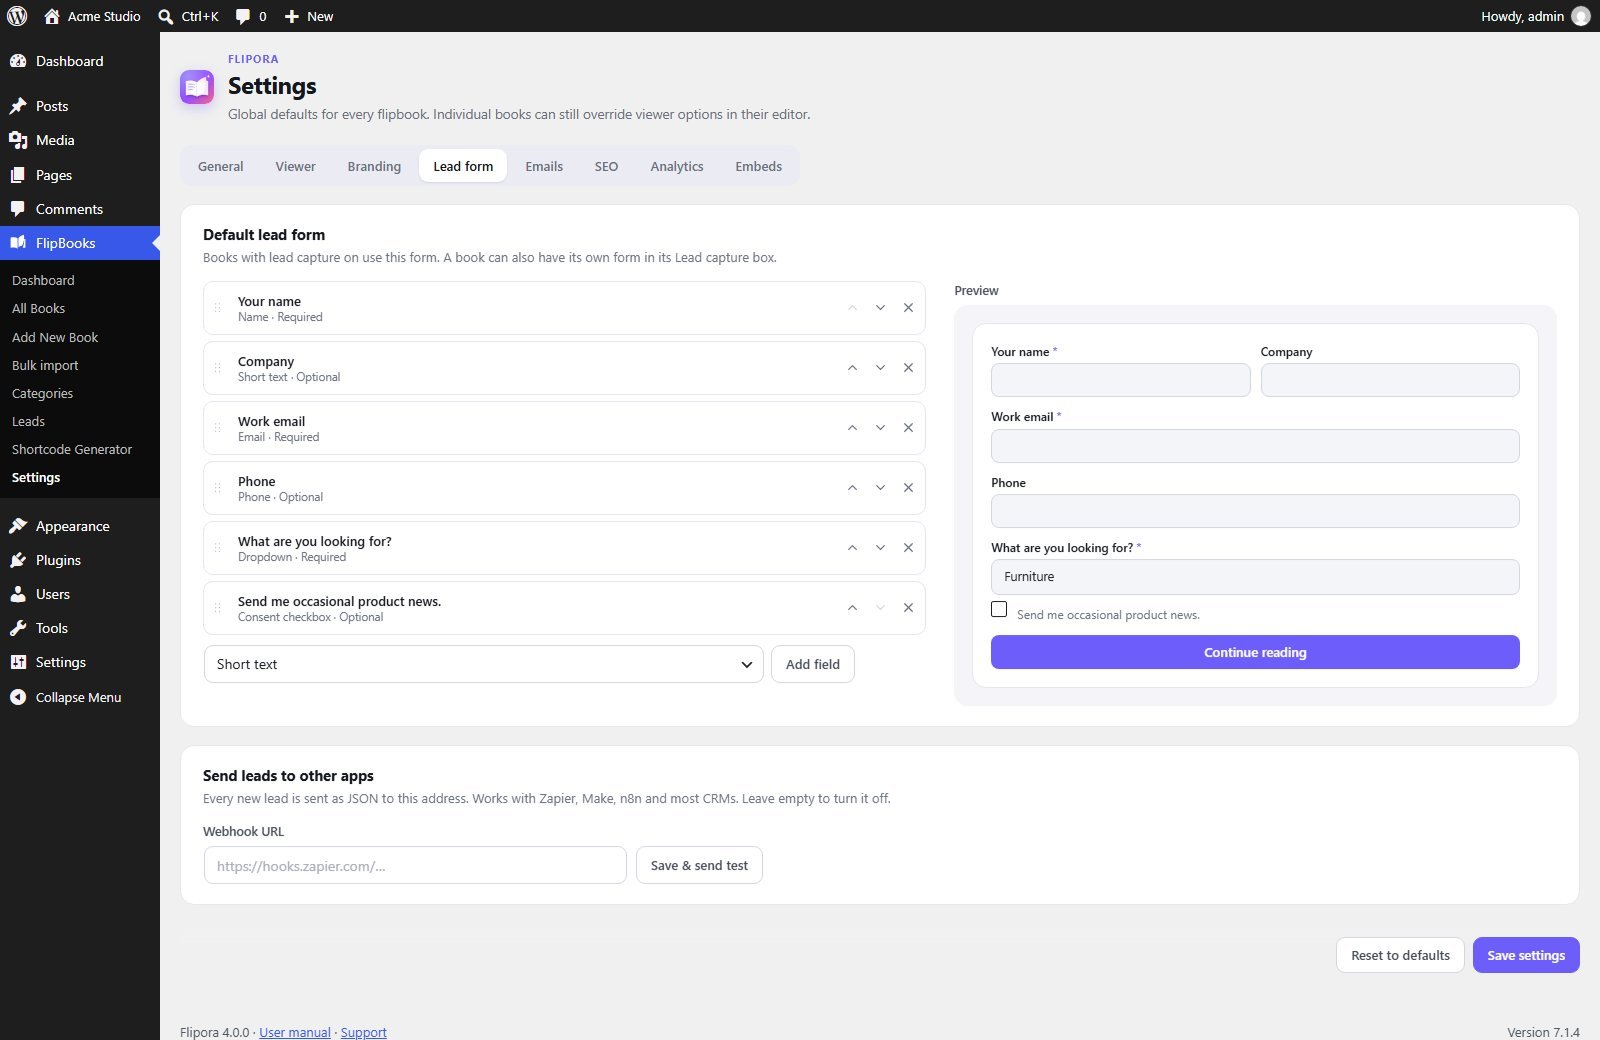
- Choose a field type and click Add field.
- Click a field to edit its label, placeholder, options and whether it's required. You can also make it half width. Two half-width fields next to each other share a row.
- Drag fields, or use the arrows, to reorder them.
- Save. The preview updates as you work.
| Field type | Good for |
|---|---|
| Name, Email | Contact details. Flipora uses them for the thank-you email. Each can be used once per form. |
| Phone | A phone number. A phone-only form works too, but no thank-you email can be sent. |
| Short text, Long text | Company, job title, message. |
| Number, Date | Team size, preferred date. |
| Dropdown, Single choice, Multiple choice | Budget, interests, department. |
| Consent checkbox | Permission to send emails. The wording is yours. |
Each extra answer can also be used as a placeholder in the thank-you email. The builder shows the placeholder name when you edit a field.
Books that had a form before version 4.0 keep exactly the same form after upgrading.
Webhook: send leads to other apps
Enter a Webhook URL in Settings → Lead form and click Save & send test. Each new lead is then sent as JSON to that address, which works with Zapier, Make, n8n and most CRMs.
Viewing & exporting leads
FlipBooks → Leads lists everyone who filled in a form: email, name, answers, book, the page they were on, consent and date. Click an answer to see the rest.
- Filter by book or search by email, name or answer, then click Filter.
- Export CSV downloads the current list, with one column for each question.
- Tick leads and click Delete selected to remove them permanently.
If the same reader submits again with the same email for the same book, Flipora keeps one entry and doesn't send duplicate emails.
Emails
When a reader fills in the lead form, Flipora can send them a thank-you email and send you an alert — automatically, in one clean design.
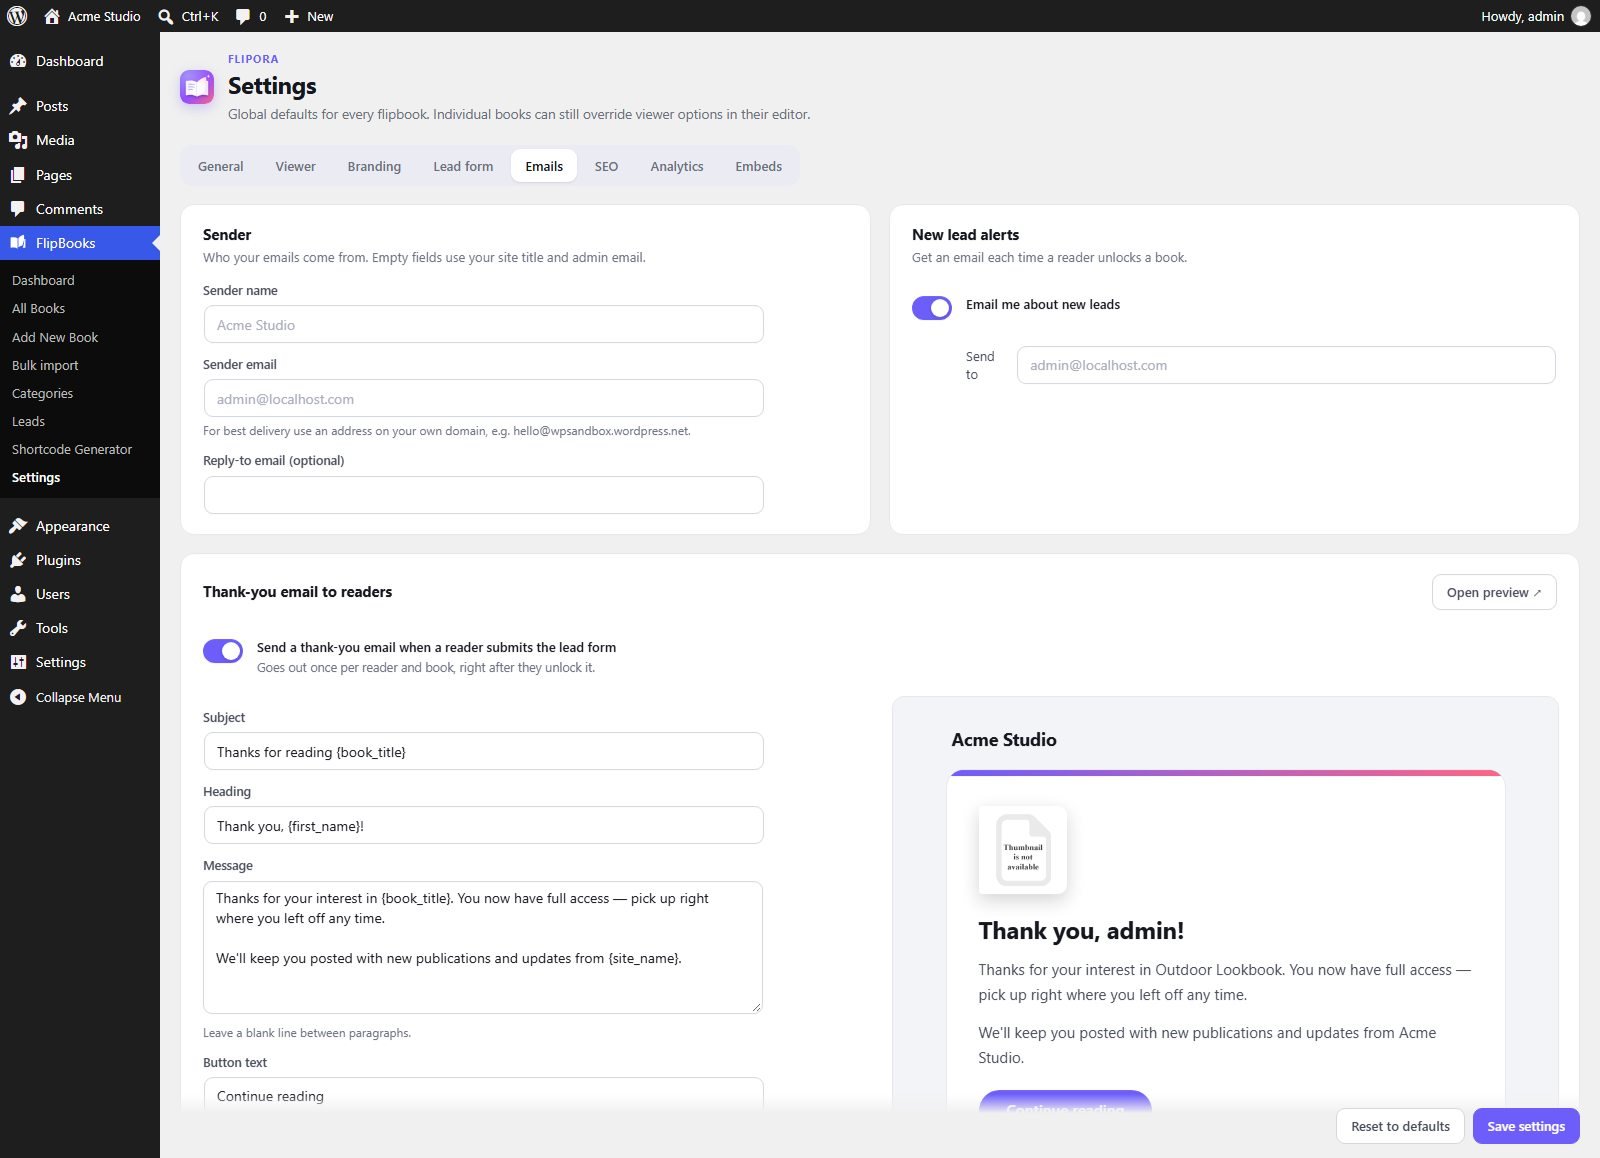
Everything lives in FlipBooks → Settings → Emails. Emails are sent through WordPress's own mail system, so any SMTP plugin you already use applies automatically.
Sender
- Sender name — empty means your site title.
- Sender email — empty means your site's admin email. For best delivery use an address on your own domain, like
hello@yourbrand.com. - Reply-to email — optional; where replies from readers should go.
New lead alerts
Turn on Email me about new leads and enter the address in Send to (empty means the admin email). Each alert shows the reader's email, name, book, page and date, with a View all leads button.
Thank-you email to readers
Turn on Send a thank-you email when a reader submits the lead form and edit the Subject, Heading, Message, Button text and Sign-off. Leave a blank line between paragraphs. The button takes readers back to the book.
Use these placeholders anywhere in the text:
| Placeholder | Becomes |
|---|---|
{name} | The reader's full name (or "there" if they didn't give one) |
{first_name} | The reader's first name (or "there") |
{email} | The reader's email address |
{book_title} | The book's title |
{book_link} | The link to the book |
{site_name} | Your site title |
The preview on the right shows the saved version — click Save settings to refresh it, or Open preview to see it full size.
Email design
- Logo — shown at the top. Empty uses your viewer logo, then your site icon, then your site title as text.
- Footer text — a short line under the email, e.g. why the reader received it.
- Show "Powered by Flipora" in the footer — an optional small credit at the very bottom. It's off by default.
- Colours follow your Accent color from Settings → General.
Delivery, SMTP & testing
Many web hosts don't deliver WordPress email reliably. Always test after setting up:
- Enter your own address in Send a test email to and click Save & send test.
- A green message means WordPress handed the email over. Check your inbox and spam folder.
- A red message shows the exact error from your mail server.
If emails don't arrive, turn on Send through SMTP and enter your mail provider's details:
| Field | Typical value |
|---|---|
| SMTP host | e.g. smtp.gmail.com, smtp.zoho.com or your host's mail server |
| Port & encryption | 587 with TLS, or 465 with SSL |
| Server requires a login | On — with your email Username and Password (or an app password) |
Your SMTP password is stored safely and never shown again. To change it, type a new one; leave the field empty to keep the saved password.
Protection & scheduling
Each book has an Access & protection box in the editor sidebar.
Who can read this book?
- Everyone — the default.
- Logged-in readers — visitors see a "members only" message with a Log in to read button. Change the message in Settings → Branding.
- Specific roles — only the roles you tick (e.g. Subscriber, Editor).
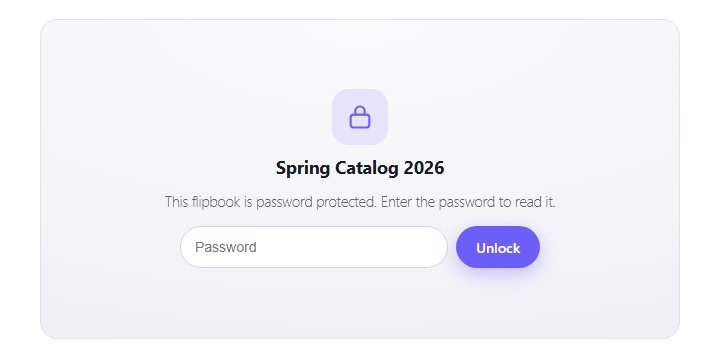
Password
Type a password and update the book. Readers enter it once per device. It's separate from WordPress logins, so you can share it freely. To change it, type a new one; to remove it, tick Remove the password.
Availability
Set Available from and/or Available until. Before the start, readers see when the book opens; after the end, they see that it's no longer available. Times use your site's timezone.
Download, print & embedding
Tick Hide the download button, Hide the print button or Block embedding on other websites for this book.
Locked books never send their pages to the browser. But hiding buttons only discourages copying — a PDF in your Media Library can still be opened by anyone who has its direct link. For sensitive files, combine a password or members-only access with a PDF that isn't linked anywhere else.
While you're logged in as an editor or admin, you always see the full book.
Analytics
FlipBooks → Dashboard shows how people read your books.
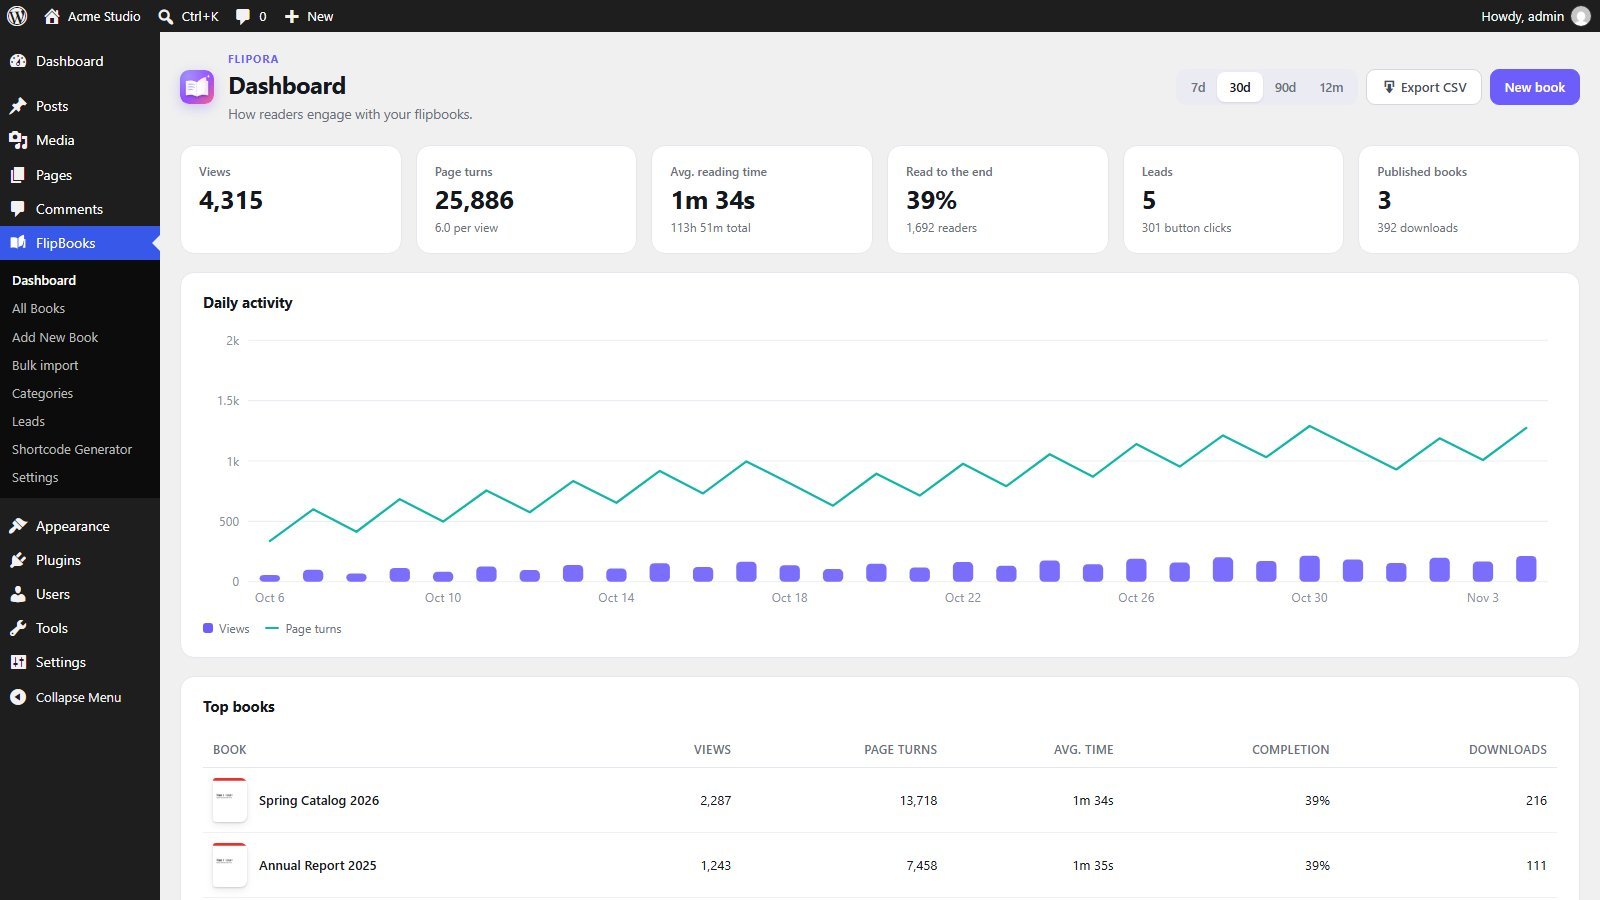
| Measure | Meaning |
|---|---|
| Views | Times a book was opened. |
| Page turns | Pages turned, and the average per view. |
| Avg. reading time | Average active time per view, plus the total. |
| Read to the end | Share of views that reached the last pages. |
| Leads | Lead forms submitted in the period, plus call-to-action button clicks. |
| Downloads | Times the PDF was downloaded from the viewer. |
- Switch the period with 7d, 30d, 90d and 12m.
- Top books ranks your books. Click one (or Analytics in the book list) for that book alone, including its page attention — how often each page was seen.
- Export CSV downloads daily figures for the chosen period.
In Settings → Analytics you can turn analytics off, ignore visits from editors and admins (on by default), and send page views to Google Analytics if your site already loads it.
SEO & AI search
A 3D book is drawn on a canvas that crawlers can't read. Flipora gives search engines and AI assistants the words and structure they need.
What happens automatically
- Text capture: when you add a PDF, Flipora reads its text in your browser and saves it with the book.
- Text version: the text appears under the book in a collapsed Read the text version section. Pages behind a lead form stay out.
- Tags: book pages get a meta description, Open Graph and Twitter tags, and a large social image of page one.
- Structured data: schema.org data with the title, page count, publisher and a link to the PDF.
- Locked books: books with a password, members-only access or a closed schedule are marked noindex and left out of your sitemap.
The Search & sharing box
In the book editor, this box shows a short checklist, and lets you set:
| Option | What it does |
|---|---|
| Search title | The title in search results. Empty: the book title. |
| Description | One or two sentences for search results and social shares. Empty: taken from the PDF. |
| Social image URL | The image for social shares. Empty: a large image of page one. |
| Text version under the book | Show, hide or follow the site setting. |
| Capture again | Reads the PDF's text again, for example after you replace the file. |
| Hide this book from search engines | Marks the book noindex and leaves it out of your sitemap. |
With an SEO plugin
If Yoast SEO, Rank Math, All in One SEO, SEOPress or The SEO Framework is active, that plugin keeps control of the title, description and social tags, so nothing is duplicated. Flipora adds the text version and structured data.
Site-wide settings
Settings → SEO turns the tags and text version on or off, adds books to your own site search, and sets the content type (Book, Report, Document or General content).
These tools help search engines and AI assistants understand your book, but no plugin can guarantee a ranking. Good content, a clear title and links from your own pages matter too. A scanned PDF has no text to capture unless you run OCR on it first.
Bulk import
Turn many PDFs into many books in one go.
- Open FlipBooks → Bulk import.
- Drop several PDFs onto the panel, or click Choose from media library and select several.
- Each PDF is checked and its page count shown. Remove any you don't want with ×.
- Choose Status (Draft or Published), an optional Category and a Book style.
- Click Create books. Each row shows Created with Edit and View links. Covers and the text for search engines are captured automatically.
Book titles come from the PDF titles in your Media Library — rename them there first if you like.
Settings reference
FlipBooks → Settings holds the defaults for every book. Individual books can override viewer options in their editor.
| Tab | Options |
|---|---|
| General | Default viewer skin (Studio Light, Studio Dark, Studio Paper, Classic White) · accent colour · lightbox style · viewer background (transparent, skin gradient, custom colour with opacity) · book permalink base. |
| Viewer | Reader tools · book title and toolbar shape and size · toolbar buttons · sounds, single page on phones and auto-play at start · resume, progress bar, keyboard shortcuts, light/dark switch and auto-hide · loading messages. |
| Branding | Viewer logo and where it links · watermark text over the pages · members-only message · custom CSS for every skin (the root element is .main). |
| Lead form | The default form builder · webhook — see Lead forms. |
| Emails | Sender · lead alerts · thank-you email · email design · SMTP delivery and test — see Emails. |
| SEO | SEO tags · text version · site search · content type — see SEO & AI search. |
| Analytics | Collect reader analytics · ignore editors and admins · send page views to Google Analytics. |
| Embeds | Allow embedding on other websites · allowed websites list. |
Reset to defaults at the bottom restores every setting on all tabs. Your books, leads and statistics are not affected.
Privacy & data
- Analytics are anonymous daily totals per book. Flipora sets no cookies and stores no IP addresses for analytics.
- The viewer remembers a reader's last page, theme choice, lead-form status, saved pages and notes in their own browser (local storage), not on your server.
- Leads are stored only in your WordPress database. They're included in WordPress's Tools → Export Personal Data and Erase Personal Data.
- Flipora doesn't send any data to outside servers. Optional exceptions you control: your webhook (each new lead goes to the address you enter), SMTP (your mail provider), Google Analytics (if you turn it on and your site already uses it), and share links readers choose to click.
- If a book page includes YouTube videos (in image/HTML books), YouTube's player loads only on those pages.
If you collect emails, mention it in your site's privacy policy and use the consent checkbox where your local law requires it.
Troubleshooting
Lead or test emails don't arrive
Use Save & send test (see Delivery). Set up SMTP or an SMTP plugin, use a sender address on your own domain, and check spam folders.
The book doesn't appear, or keeps loading
- Open the book's own page. If it works there, the problem is the placement — check the shortcode ID or block selection.
- Caching or "optimisation" plugins that combine or delay JavaScript can block the viewer. Exclude Flipora's files, or the book pages, from those features and clear the cache.
- A PDF loaded with Use a link from another website may be blocked by that site. Upload the PDF to your Media Library instead.
The book page shows "Page not found"
Go to Settings → Permalinks in WordPress and click Save Changes once. This refreshes the addresses, which is needed after changing the permalink base.
An embedded book is blank on another website
Check that embedding is allowed in Settings → Embeds, that the other site's domain is in the allowed list (or the list is empty), and that the book isn't set to block embedding.
The lead form doesn't show
Each reader is asked only once per book on their device — after submitting, or after "Not now" for the rest of that visit. Test in a private browser window, and check that the form's page number isn't higher than the book's page count.
Analytics show no numbers
Visits from editors and admins are ignored by default. Check in a private window, or turn off Ignore visits from editors and admins while testing.
Read aloud or Text view is missing
Both need a PDF book, and the tool must be on in Settings → Viewer → Reader tools. Read aloud also needs a browser with speech support. A scanned PDF has no text to read unless you run OCR on it first.
The text version doesn't appear
Open the book in the editor and check the Search & sharing box. If no text was captured, click Capture again and wait for the page count to appear, then click Update.
Still stuck? We're here to help.
Send us a message with your WordPress version, a link to the page and what you see. Screenshots help a lot.